Flash STF-AL10 into Lineage
After getting a new phone again, and after a week of persistent effort, I finally managed to flash Lineage onto my previously unlocked bootloader phone (STF-AL10).
Here's a description of the complete flashing process.
Unlock bootloader
The STF-AL10 uses the Kirin 960 processor. Free solutions for this processor are available online – disassemble the device, short-circuit it to enter EDL mode, and use potatoNV to inject the unlock code. For details, please refer to the "How to Unlock the Bootloader at Zero Cost" section of this article or Caiwen's blog.
Flashing
Finding ROM
Since the STF-AL10 phone was released in 2017, eight years have passed since the date of writing, and there are still quite a few ROMs for this phone on XDA. I chose LeaOS, which runs Android 13 and is a heavily modified version of lineage. This ROM is also adapted to Honor devices to a certain extent. For STF-AL10, I downloaded the package LeaOS-20.0-20251019-iceows-google-stf.img.xz.
Backup
Although my phone, which I hadn't used for four years, didn't have any important data left, ChatGPT strongly recommended that I back it up. So I started looking for TWRP compatible with my current system, EMUI 5.1. This process was very arduous, but I finally found the following link in a place I can't remember now:
[LIST] [STRIKE][URL="https://mega.nz/#!C0RmiCZT!2LwBaeWnNDM-cMVjQCq19a60crWOUytS4y_5Ml8sDhk"][U]download twrp-3.1.1-0-stf.img[/U][/URL][/STRIKE] Temporary Solution [URL="https://www.androidfilehost.com/?fid=745849072291684672"]twrp-3.1.1-1-stf.img[/URL] md5: db84a0c2780e010369c6e365277d17e7 [/LIST]
The link for "mega" is invalid, while the corresponding file twrp-3.1.1-1-stf.img is still working. Therefore, in fastboot, executing fastboot flash recovery twrp-3.1.1-1-stf.img, unplugging the data cable, and restarting by pressing the power and volume up buttons successfully booted into TWRP.
I chose to use TWRP's backup function to back up the system boot data cust partition and the user's SD card path /data/media/0. The latter mainly contains some old photos, documents, and almost useless app data, which together amount to nearly 40GB. Since I don't use it often, I chose to back it up to a larger external hard drive.
Getting bricked
Since my phone is running EMUI 5.1, and this ROM is compatible with EMUI 9.1, I followed caiwen's blog to flash EMUI 8 using TWRP, and then gradually upgraded to 9.1. The only difference between my procedure and the blog post was that I used the latest official version of HuRUpdater, v0.4. However, unfortunately, something went wrong—for unknown reasons, the TWRP script executed successfully, but my phone seems to have become bricked.
Then I tried restarting my phone and found that the screen was not working completely. Not only could I not access the system, but I couldn't even enter recovery or fastboot mode. Pressing any button, charging, or plugging the phone into the computer had no effect whatsoever. The screen was off, the indicator lights were off, and the phone didn't vibrate; it was like a black brick. I searched online and, surprisingly, there really is a term called "black brick" to describe this state.
At that point, ChatGPT was even advising me to take my phone to a repair shop. Naturally, I couldn't give up on flashing the ROM so easily. After all, it had been four years since I last reached this point, and if I gave up this time, who knows how many more years I'd have to wait? So I started frantically searching for solutions using ATFAT and STFW, and found this outline guide.
According to the guide, I needed to download the Hunter Huawei Standalone Cracked Version and install a series of drivers for Huawei phones. Because some drivers for older Huawei devices weren't signed for Windows 11, installing Windows 11 directly on my machine failed. Solutions included disabling Core Isolation or installing a Windows 7 virtual machine; I felt the former wasn't clean enough, so I chose the latter.
After installing Windows 7 on a virtual machine, I connected my phone to it. A device named USB SER (possibly with an exclamation mark) appeared in Device Manager, indicating that the virtual machine needed the corresponding driver. Following the instructions, I first installed Huawei F**king Awesome Driver.exe (the name is ... questionable). If all goes well, USB SER in Device Manager will change to HUAWEI USB COM 1.0. Then, I opened Huawei Flash-One-Click Start.bat, ignoring the two error messages (possibly related to the dongle), and arrived at the main interface. I selected the USB COM 1.0 option, changed the processor to the Kirin 960 corresponding to STF-AL10, and left the port either Auto or selected the port displayed in Device Manager. Then, I clicked START to recover the bricked device.
If all goes well, the phone will vibrate and reboot into fastboot mode. The screen may still be black, but you'll be able to see the corresponding device in fastboot devices. At this point, you can go to Wanwei Forum to find the official package suitable for STF-AL10.
This website requires a 10 RMB deposit to download up to three packages per hour. However, considering that flashing a device might require trying many packages, and similar websites typically charge 2 RMB per package, and taking into account the significant time cost of finding resources for free, I think 10 RMB is acceptable.
The directory structure of an official package is usually like this: after opening the zip archive, there is a dload directory within the software folder, with the following structure:
dload\
|--STF-AL00_all_cn
    ...
|--STF-AL10_all_cn
   |--update_sd_STF-AL10_all_cn.zip
|--update_sd_base.zip
Normally, we refer to
update_sd_base.zipas the "large package", while theupdate_sd_STF-AL10_all_cn.zipcorresponding to a specific device model is called the "small package". When flashing the ROM, you should first flash the "large package" and then flash the "small package".
Our goal now is to unpack these two zip files. Each zip file contains a file named UPDATE.APP. We'll first load the UPDATE.APP file from the larger zip file into the Write Flash section of the Hunter Huawei Standalone Cracked Version. You'll usually get the following result:
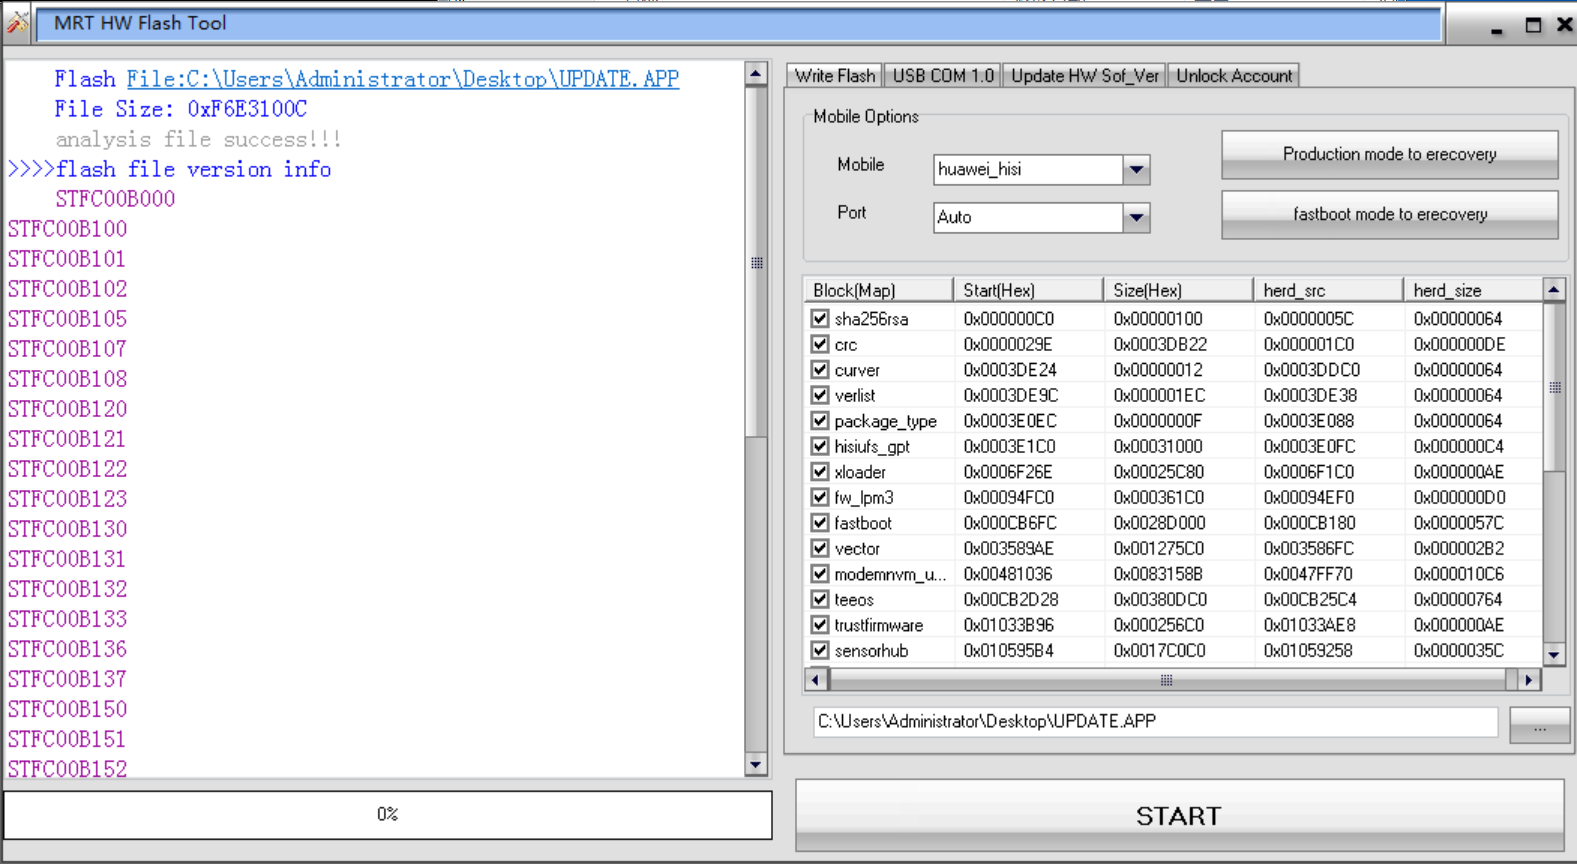
Pay attention to the version number on the left. You can use fastboot oem get-build-number to look up your phone's OEM number. If your number happens to be in the list on the left (mine is), there's a high probability of a successful flash (of course, if it's not in the list, it doesn't necessarily mean it will fail; it's still a matter of luck). In short, in my case, after flashing the large ROM corresponding to this package, my phone was fully restored (except for the two buttons on either side of the home button not working, everything else was normal), and I didn't bother with the smaller ROM.
As for how to speed up BaiduNetDisk, most of the high-speed and free download tools seem to be unavailable. You could consider renting a temporary account for one yuan a day on Xianyu or buying a 7-day membership for a few yuan.
Update to EMUI 9
After successfully flashing back to the official EMUI 5.1, all my data was indeed wiped, and the bootloader even locked my phone. Fortunately, I still had the unlock code from Taobao, so I could still use it to unlock my phone again.
Then, to my surprise, I found that the system update function was working again. So I upgraded from EMUI 5.1 OTA to 5.1->8.0->9.0->9.1, the process was very smooth, without any problems, and the bootloader didn't lock again.
Stuck in bootloop
After upgrading EMUI to version 9.1, I followed the instructions in the LeaOS post to flash a custom ROM. The prerequisites were TWRP installed on the system and the bootloader unlocked. I had already unlocked the bootloader, and the TWRP version compatible with EMUI 9.1 could be found in post 5, so I got started.
I entered fastboot mode and then executed fastboot flash system LeaOS-20.0-20251019-iceows-google-stf.img, and the following error occurred:
$ fastboot flash system LeaOS-20.0-20230304-iceows-google-stf.img
Invalid sparse file format at header magic
Sending sparse 'system' 1/7 (460241 KB)            OKAY [ 11.774s]
Writing 'system'                                   FAILED (remote: 'sparse flash write failure')
fastboot: error: Command failed
After checking, the reason was that the system partition was smaller than the required size of the image. I needed to use the Huawei system partitioning tool in XDA to expand the system partition and then re-flash the device.
However, knowing the cause of the error didn't change anything. The phone started endlessly rebooting—another night was wasted. The process was roughly the same as in the "Getting Bricked" section: finding a ROM with a version number close to the current phone and then trying it repeatedly with a ROM hunter tool—except this time the OEM number didn't match perfectly, but it still booted successfully, I don't know why.
Expand the system partition
After recovering my phone a second time, just to be on the safe side, I updated it to the version with the exact same serial number as the OEM version before expanding the system partition. The script in this tool worked fine following the steps in the README file within the compressed package. However, the only flaw was that steps 6 and 9 in the README didn't automatically generate the HW and HW-IMG paths; instead, the artifacts were placed directly in the tool's root directory.
Specifically, the artifacts for the HW path are as follows:
2025/11/28 Fri  10:53 PM               621 5-FlashIMG.cmd
2025/11/28 Fri  10:53 PM               596 5-FlashIMG.sh
2025/11/28 Fri  10:53 PM               938 backup.sh
2025/11/28 Fri  10:53 PM               115 clearpart.sh
2025/11/28 Fri  10:53 PM               204 formatpart.sh
2025/11/28 Fri  10:53 PM             5,900 HuaweiFileGPT-MMC.txt
2025/11/28 Fri  10:53 PM                 0 HuaweiFileGPT-UFS.txt
2025/11/28 Fri  10:53 PM             6,040 HuaweiFilePart.txt
2025/11/28 Fri  10:53 PM               552 makepart.sh
2025/11/28 Fri  10:53 PM               413 restore.sh
The output of HW-IMG is as follows:
2025/11/28 Fri  11:08 PM       209,715,200 patch_a.img
2025/11/28 Fri  11:13 PM       310,378,496 preas.img
2025/11/28 Fri  11:09 PM        33,554,432 preavs.img
2025/11/28 Fri  11:05 PM       134,217,728 reserved5.img
2025/11/28 Fri  11:55 PM     2,860,515,328 system_a.img
You need to manually move these files from the root directory to these two paths to ensure the script runs correctly.
Additionally, to verify that your system partition has indeed expanded to the capacity you set in the HWGSIPartition application (default 3.5G), you can check it using df -h /system in the installed TWRP. If system is not mounted, you can also find the mapping between the system partition and the block device by checking /proc/mounts, then use the relevant command (ATFAI) to get the number of blocks on that block device, and finally multiply by 512 and divide by 2^30 to get the number of GB.
The 3rd try
After ensuring my system partition was indeed 3.5GB (actually, more than 2.8GB should be fine), I proceeded with the third flashing operation. Following the steps outlined in the LeaOS post, except for the optional steps, I succeeded.
Note that when flashing TWRP, you must unplug the data cable and restart the computer, pressing the power button and volume up button.
The flashed system ran without any major issues; Wi-Fi, camera, Bluetooth, GPS, and other functions all worked normally, and Google Play also worked fine. The only downside was a significant drop in battery life; even when left idle, it barely lasted a day, whereas the stock battery could last a week. (Of course, this is a minor drawback for a non-primary phone.)
Using Magisk and passing Play Integrity check
magisk
For instructions on flashing Magisk, please refer to caiwen's blog. Unfortunately, the link to the Huawei unpacking tool provided on the blog is no longer valid. However, the HuaweiUpdateExtractor.exe file in the HuaweiUpdateExtractor folder of this GitHub repository is a usable unpacking tool. Follow the steps outlined in his blog for the rest of the process. I successfully completed this task, so I won't go into the details.
For non-Chinese speakers that cannot read the caiwen's blog: For most devices,
boot.imgis repaired. EMUI 5 repairsboot.img; EMUI 8 repairsramdisk.img; and EMUI 9 and HarmonyOS repairRECOVERY_RAMDIS.imginUPDATE.APPusing the unpacking tool.Vbmetapartition is not bothered.
play integrity/safetynet
For information on how to pass Google's Play Integrity/SafetyNet certification, the current solution can be found in this GitHub repository. Due to time constraints, I chose to use WSA with Magisk pre-installed for verification.
By the way, the latest available WSA installation guide (as of November 2025) is available at WSABuilds, which provides a solution to the problem of WSA not working properly due to the July Windows update.
I used the IntegrityBox (MeowNa) solution. Besides installing all five packages provided in the guide, I also installed KsuWebUI. After following the guide, I opened the IntegrityBox settings for KsuWebUI and performed the following operations:
- Play Integrity Fix -> PIF Setting, enable the first five options (i.e.
Spoof BuildtoSpoof Fingerprint) Kill GMS Process- Click
Update Keyboxin Tricky Store
Then you can pass the Strong Integrity check.
However, the cat-and-mouse game between Google and these developers is expected to be quite intense, with developers updating their repositories on a daily basis. This solution may not be sustainable in the long run...